In this lesson, we'll learn how to use masks. A mask can be used to dress up part of a tag. Here are some examples of tags with masks:

(the flowery looking part in back is the mask)

(the mask here is the wispy looking part in the back)

(see the text in the background of this? That's the mask, used as an overlay)
There are two ways to use masks in PSP, we're only going to go over the easy one, because both methods achieve the same thing.
To get started, you need a tag. Something simple will be fine, you can even follow
this tut by Beth to make a simple name siggie to start with.
Now, once you have your tag, you need to find a mask to use. Some of my favorite masks are from:
So, have your tag open in PSP. It's best to have a canvas with the same proportions as your mask. If it isn't already the same, go to Image->Canvas size, and resize the canvas so it will work. I usually just use the same dimensions as my mask. This is to make sure your mask doesn't get stretched out in the process. Make sure to center the tag in the canvas.
Now, open your mask in PSP.
On your tag, if you have a colored background layer (typically white), delete it. You can use the little trash can symbol at the bottom of the layers palette, shown below.
If your tag has multiple layers, after deleting the background, right click on any other layer in the layers palette. Hover over Merge, then click Merge Visible. Now, you just have the one layer.
Click the little piece of paper icon in the bottom left corner of the layers palette to add a new layer. When the box pops up, just click ok.
Now, flood fill with a color of your choice. Or you can copy and paste a paper, then crop to the borders of the image (remember the crop tool?)
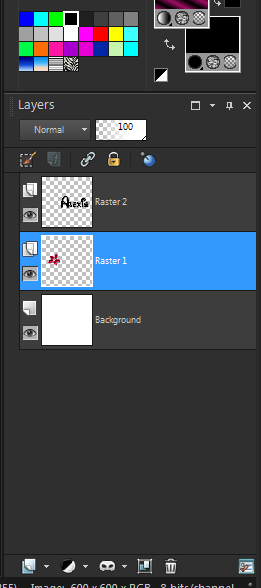
Now, make sure the layer you're adding the mask to is still active, it should be highlighted blue in your layers palette.
See the little mask symbol at the bottom of the layers palette? Click that, then click From Image. This box will pop up
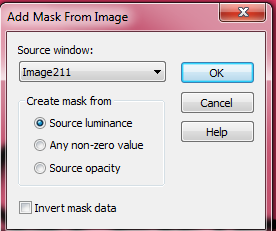
See the drop down, where mine says Image211? Click that, then click the name of the mask you opened.
If your mask has a white image on a black background, click okay. If it is a black image on a white background, click in the box next to "Invert Mask data", then click okay.
Now, in your layers palette, it will look something like this:

See how the layer you applied the mask to, the mask itself, and the end result are staggered? This is called a layer group. Right click on part of the group, then hover over Merge, and click Merge group.
Now, you have your mask. If you are happy with it, go ahead and merge visible, and crop the image, and save it.
If you're not happy with it, you can change it up a little. I ended up changing the mask after the screenshot, because the first one I tried just didn't quite work. Then, once I had the right mask, I had to resize it and apply a filter to make it look exactly right for the tag. Play around with it. Sometimes layering one mask over another is a great idea, other times, adding a shadow is all you need. Of course, a lot of times, you don't have to do anything other than maybe resize or reposition the mask.
Sometimes, the best way to see what you're really working with is to add a white background behind your mask, then delete it later.
Once you're happy with the way everything looks, delete the background if you added one, merge visible, crop the image, and save it.
Here's what I ended up with: